


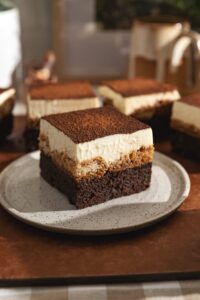
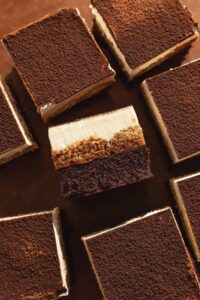
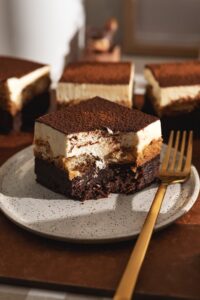
These tiramisu brownies are made with a rich and fudgy brown butter brownie layer with soft espresso-soaked ladyfingers and mascarpone cream on top. It’s the perfect combination of two beloved desserts in one.
Notes from the baker
Tiramisu brownies have been popping up on social media for good reason! They’re delicious and the perfect combination of two decadent desserts. The richer and denser brownies pair nicely with the lighter and creamier tiramisu on top.
I find that they’re a bit tricky when it comes to serving time because the tiramisu part needs to be refrigerated, but the butter and chocolate in the brownies harden when cold. To mitigate this, I’d recommend chilling the brownies as little as possible (only until the mascarpone sets) and bringing them back to room temperature before serving.
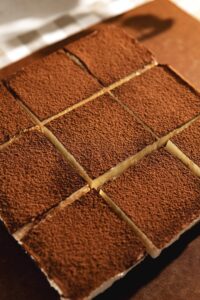
These tiramisu brownies have such a satisfying cross-section, too! I love seeing the layers after slicing them into squares. I hope you love them too.
Why you’ll love this recipe
- Rich and fudgy brownies. The brownie layer is made with browned butter and dark chocolate for a decadent addition to the tiramisu.
- Soft, espresso-soaked ladyfingers. The ladyfingers become soft like sponge cake with a delicious espresso flavour.
- Dreamy and easy-to-make mascarpone cream. We’re skipping the traditional mascarpone cream method (with egg yolks) to make the tiramisu extra easy to make.
- Two desserts in one!
Tools
- 9×9″ square pan – The perfect size of a pan for this recipe. It fits 12 ladyfingers perfectly. I’d recommend a light-coloured pan to avoid overbaking the edges of the brownies.
- Electric hand mixer – The brownies can be mixed with a regular whisk or a hand mixer, but a hand mixer is recommended for mixing the mascarpone cream.
- Offset spatula – An offset spatula has the perfect angle for spreading brownie batter and mascarpone cream into a smooth and even layer.
- Fine mesh sieve – You’ll need this for dusting the top of the tiramisu with cocoa powder.
Ingredient notes
As always, the full recipe card with ingredient amounts and instructions is at the bottom of this post! Keep reading for more details on each ingredient or skip ahead to the recipe.
- Dark or semi-sweet chocolate – Use any good quality chocolate bar you like. Dark chocolate works well here to offset the sweetness and complement the espresso flavour. Finely chop the chocolate to ensure it melts evenly and quickly.
- Natural cocoa powder – Unsweetened, natural cocoa powder is the most common kind of cocoa powder you can find in most grocery stores.
- Unsalted butter – We’re going to be browning the butter so it should be roughly cubed to ensure it melts and browns evenly.
- Eggs – These should be at room temperature to prevent the melted butter and chocolate mixture from solidifying on contact.
- Granulated sugar
- Brown sugar
- All-purpose flour
- Mascarpone cheese – This is a soft and mild cheese that’s a key ingredient in tiramisu.
- Whipping cream – This should be used cold from the fridge so that it whips up faster.
- Powdered sugar
- Vanilla extract
- Espresso powder – Use your favourite instant espresso powder, brewed espresso, or coffee.
- Coffee liqueur or dark rum (optional) – This boozy addition to the tiramisu gives it a subtle kick, but it’s entirely optional. I used Kahlua as my coffee liqueur.
- Ladyfingers – Use pre-packaged crunchy ladyfingers. Once they soak up the espresso mixture and marinate with the mascarpone cream, they’ll become soft and cake-like. You can also bake your own ladyfingers if you’re so inclined, but I prefer store-bought ladyfingers to make this recipe easy!
Tips for making the best tiramisu brownies
- Remove the browned butter from the heat promptly. The browning of the milk solids happens fast. Keep watching it and remove it from the heat once all of the little bits at the bottom of the pan are golden brown to prevent them from burning. Pour the browned butter into the bowl of chocolate immediately so it doesn’t keep cooking in the hot pan.
- Don’t overbake the brownies. The brownies should be set on the edges and still slightly underbaked in the middle. A toothpick inserted in the middle should come out slightly wet.
- Let the brownies (and the pan) cool in the fridge right after baking. The pan should be cool to the touch before you add the mascarpone cream; otherwise, it will melt. Popping the pan in the fridge immediately stops the brownies from continuing to cook (and overbaking) and cools them down faster.
- Don’t completely soak the ladyfingers. A quick dip is enough to saturate the ladyfingers in the espresso mixture. They absorb liquid very quickly. If you submerge them for too long, they will become soggy and mushy and probably fall apart before you can even put them in the pan.
- Warm up the brownies before serving if chilled overnight. Chilling the brownies for an extended amount of time makes them extra fudgy and dense since butter and chocolate both harden when cold. If you prefer this, great! If you prefer a softer brownie texture, I would recommend minimizing the amount of time the brownies spend in the fridge and also warming up the brownie layer (NOT the mascarpone layer) before cutting and serving by either submerging it in the bottom of the pan in hot water or passing a kitchen torch across the bottom of the pan until warm.
Storage
These tiramisu brownies should be stored in an airtight container in the fridge for up to 3 days because of the mascarpone and cream in the tiramisu. However, they have the best texture at room temperature. Allow them to sit out at room temperature for at least 30 minutes before serving.
The brownie layer (without the tiramisu layer) can be stored in an airtight container at room temperature for up to 3 days. I would recommend keeping the brownies at room temperature and only chilling them in the fridge after adding the tiramisu layer for only about 1 hour until set before serving for the best brownie texture.
Frequently Asked Question
Why are your measurements in grams? Why do you mix gram measurements with tablespoons/teaspoons?
Small measurements are given in tablespoons and teaspoons because most kitchen scales are not accurate under about 10g. Tiny amounts, like a ¼ teaspoon, may not register accurately unless you have a drug scale. Mixing these measurements is a common practice among other recipe sites and commercial kitchens.