


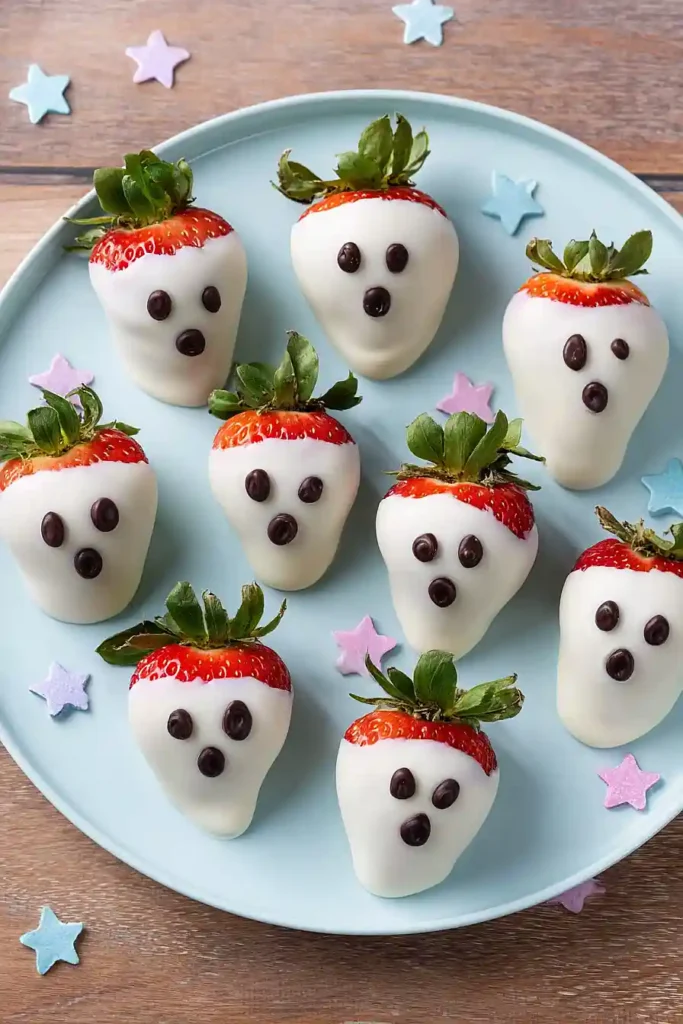
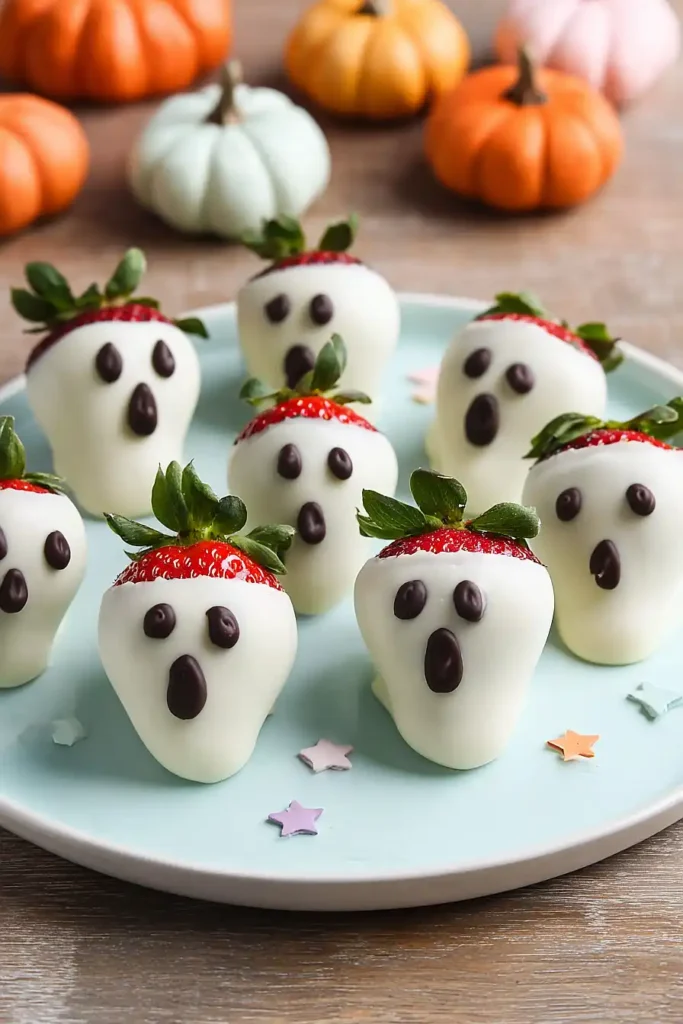
Here are my ghost chocolate covered strawberries, with smooth white chocolate coating, a touch of coconut oil for the perfect consistency, and cute little ghost faces made with black icing.
These chocolate covered strawberries are always a hit at Halloween parties. My kids love helping me draw on the little ghost faces, and they disappear from the platter in minutes!
What Kind of Strawberries Should I Use?
Fresh strawberries are definitely the way to go for this recipe, and you’ll want to pick ones that are firm and ripe with bright red color. Avoid strawberries that are overly soft or have mushy spots, as they won’t hold up well when you dip them in chocolate. Look for berries with the green stems still attached – they make perfect little handles for dipping and also add a nice visual touch to your ghost decorations. Make sure to wash and completely dry your strawberries before dipping, because even a tiny bit of water can cause the chocolate to seize up and get clumpy.
Options for Substitutions
This fun Halloween treat is simple, but here are some swaps you can make if needed:
- White chocolate wafers: If you can’t find white chocolate wafers, regular white chocolate chips work fine. You can also use white candy melts, which are actually easier to work with since they melt smoothly without needing to temper the chocolate.
- Black icing tube: Don’t have a tube of black icing? You can make your own by mixing powdered sugar with a tiny bit of milk and black food coloring until it’s thick enough to pipe. Or use a food-safe black marker to draw the ghost faces – it’s easier than you’d think!
- Strawberries: Make sure your strawberries are fresh and dry before dipping. If strawberries aren’t in season or look sad at the store, you can use this same technique with banana slices or marshmallows for a different ghost treat.
Watch Out for These Mistakes While Making
The biggest mistake when dipping strawberries is not drying them completely after washing – even a little moisture will cause the chocolate to seize up and become grainy, so pat them thoroughly with paper towels and let them air dry for a few minutes.
Overheating white chocolate is another common problem that leads to a thick, clumpy coating instead of a smooth one, so stick to those 30-second intervals and stir well between each round in the microwave.
Don’t rush to decorate with the black icing right after dipping – if the chocolate isn’t fully set, the icing will bleed and your ghost faces will look smudged, so give them the full 5 minutes in the fridge or even a bit longer.
For cleaner lines when drawing faces, hold the icing tube at a 45-degree angle and apply steady, gentle pressure rather than squeezing too hard.

What to Serve With Ghost Chocolate Covered Strawberries?
These spooky treats are perfect on their own as a fun Halloween dessert, but they’re even better when you make them part of a dessert spread. I love setting them out alongside other Halloween goodies like sugar cookies decorated with orange and black frosting, or some chocolate cupcakes with spider web designs. They also look great on a platter with other chocolate-dipped fruits like bananas or apple slices if you want to keep the fruit theme going. For parties, I’ll sometimes serve them with hot chocolate or apple cider so guests have something warm to sip on while they snack on these cute little ghosts.
Storage Instructions
Store: These ghost strawberries are best enjoyed the same day you make them, but they’ll keep in the fridge for up to 2 days. Place them in a single layer on a parchment-lined plate or container, making sure they don’t touch each other so the chocolate doesn’t stick together.
Keep Cool: Don’t leave these cuties out at room temperature for too long, especially if it’s warm. The chocolate can get soft and the strawberries will start to release moisture, which can make the chocolate weep. Keep them chilled until about 15 minutes before serving for the best texture.
Avoid Freezing: I don’t recommend freezing these because strawberries get mushy when thawed, and the chocolate coating can crack and look messy. They’re so quick to make that it’s better to just whip up a fresh batch when you need them!
| Preparation Time | 20-30 minutes |
| Cooking Time | 5-10 minutes |
| Total Time | 25-40 minutes |
| Level of Difficulty | Easy |
| Servings | 12 pieces |
Estimated Nutrition
Estimated nutrition for the whole recipe (without optional ingredients):
- Calories: 750-850
- Protein: 8-10 g
- Fat: 32-38 g
- Carbohydrates: 110-120 g
Ingredients
- 1 pint strawberries (I prefer Driscoll’s for their consistent size)
- 7 oz white chocolate wafers (I use Ghirardelli for the smoothest melt)
- 1/2 teaspoon coconut oil
- 1 tube black decorating icing
Step 1: Prepare Your Workspace and Strawberries
- 1 pint strawberries
- parchment paper
Line a baking sheet with parchment paper and set it nearby your work area.
Rinse the strawberries gently under cold water and pat them completely dry with paper towels—any moisture will prevent the chocolate from adhering properly.
Keep the strawberries at room temperature so the warm chocolate coating sets quickly and evenly on contact.
Step 2: Melt the White Chocolate with Coconut Oil
- 7 oz white chocolate wafers
- 1/2 teaspoon coconut oil
Combine the white chocolate wafers and coconut oil in a microwave-safe bowl.
Heat in 30-second intervals, stirring between each interval, until the mixture is completely smooth and pourable—this typically takes 1 to 1.5 minutes total.
The coconut oil helps thin the chocolate slightly for easier dipping without making it taste coconutty.
I like to use a rubber spatula for stirring because it scrapes the sides better and prevents lumps from forming.
Step 3: Dip Strawberries and Chill
- melted white chocolate mixture from Step 2
- prepared strawberries from Step 1
Working quickly while the chocolate is still warm, grasp each strawberry by the stem and dip it into the melted white chocolate from Step 2, coating it completely but leaving the stem exposed.
Place each dipped strawberry point-side down on the prepared parchment paper.
Once all strawberries are dipped, transfer the baking sheet to the refrigerator and chill for 5 minutes until the chocolate coating is set and firm to the touch.
Step 4: Decorate with Ghost Features
- 1 tube black decorating icing
- chilled strawberries from Step 3
Remove the chilled strawberries from the refrigerator and let them sit at room temperature for 1 minute so the icing adheres better.
Using the black decorating icing tube, pipe two small dots for eyes and a curved line for a mouth on each white-chocolate-covered strawberry to create a ghost face.
I recommend piping the eyes first, then the mouth, as it’s easier to balance the expression once the eyes are in place.
Step 5: Serve and Enjoy
- decorated ghost strawberries from Step 4
Arrange the decorated ghost strawberries on a serving plate or platter.
Serve immediately at room temperature for the best flavor and texture, or keep chilled until ready to serve.
They’re best enjoyed within a few hours of decorating while the chocolate coating remains crisp.

Festive Ghost Chocolate Covered Strawberries
Ingredients
- 1 pint strawberries (I prefer Driscoll's for their consistent size)
- 7 oz white chocolate wafers (I use Ghirardelli for the smoothest melt)
- 1/2 teaspoon coconut oil
- 1 tube black decorating icing
Instructions
- Line a baking sheet with parchment paper and set it nearby your work area. Rinse the strawberries gently under cold water and pat them completely dry with paper towels—any moisture will prevent the chocolate from adhering properly. Keep the strawberries at room temperature so the warm chocolate coating sets quickly and evenly on contact.
- Combine the white chocolate wafers and coconut oil in a microwave-safe bowl. Heat in 30-second intervals, stirring between each interval, until the mixture is completely smooth and pourable—this typically takes 1 to 1.5 minutes total. The coconut oil helps thin the chocolate slightly for easier dipping without making it taste coconutty. I like to use a rubber spatula for stirring because it scrapes the sides better and prevents lumps from forming.
- Working quickly while the chocolate is still warm, grasp each strawberry by the stem and dip it into the melted white chocolate from Step 2, coating it completely but leaving the stem exposed. Place each dipped strawberry point-side down on the prepared parchment paper. Once all strawberries are dipped, transfer the baking sheet to the refrigerator and chill for 5 minutes until the chocolate coating is set and firm to the touch.
- Remove the chilled strawberries from the refrigerator and let them sit at room temperature for 1 minute so the icing adheres better. Using the black decorating icing tube, pipe two small dots for eyes and a curved line for a mouth on each white-chocolate-covered strawberry to create a ghost face. I recommend piping the eyes first, then the mouth, as it's easier to balance the expression once the eyes are in place.
- Arrange the decorated ghost strawberries on a serving plate or platter. Serve immediately at room temperature for the best flavor and texture, or keep chilled until ready to serve. They're best enjoyed within a few hours of decorating while the chocolate coating remains crisp.