Windows Modules Installer Worker: Key Takeaways
Table of Contents
Windows Modules Installer Worker is a common mistake on Windows 10 computers, causing high CPU usage. This article will tell you about Windows modules installer worker:
- The error occurs when the Windows Modules Installer Worker function becomes unresponsive.
- To fix the error, you can try changing automatic Windows updates to manual updates.
- If the previous method doesn’t work, you can fix the issue related to tiworker.exe.
- Performing a clean boot using the MSConfig tool can also help resolve the problem.
Windows Modules Installer Worker is a can Windows machine mistake, particularly on Windows 10 computers.
You may find this error when the Windows Modules Installer Worker function is non-responsive to the task manager and causes high CPU usage.

The good news is that you can correct this mistake quickly. Consider the different methods below to fix this mistake. When one strategy doesn’t fit for you, seek another one. We evaluated all of these approaches. We are secure and operate with 99 percent of users who have this issue on their Mac. You can also check out the How To Automatically Login In Windows 10.
What is Windows Modules Installer Worker?
Windows Modules Installer Employee is a Windows OS-based tool to search for upgrades. The operating system patches itself and fixes bugs with this tool.
To do this, the Windows Modules Installer Worker high disk usage process will run in the background. Sometimes it may become unanswered when searching for changes and repairing glitches. As a consequence, the machine may become totally sluggish or fully unresponsive.
If you see an issue with Windows Modules Installer Employee, we’ve got it covered here.
Below, you’ll learn how to fix the problem and keep your computer running smoothly without any further interruptions.
Why is this happening?
You know, the reason your machine produces so many noises is that this program requires a huge amount of space from your Processor, perhaps more than it should. Especially if you’re on Windows 10.
Finally, luckily for you, there’s a way to fix it. You don’t have to deal with this software taking so much space from your CPU storage, and you’re actually stopping the little noise that your computer keeps making.
There are only three simple ways to solve this issue, and fast enough, the Windows Modules Installer Worker won’t take up to 50% of your drive.
How to Fix Windows Modules Installer Worker High Disk Usage Error
This common error is easy to solve as long as you can read and follow the instructions. We also tried various methods to fix this mistake. Below are the approaches that ACTUALLY function best.
Method 1: Change Automatic Windows Updates to Manual Updates
As mentioned above, the Windows Modules Installer Employee error also occurs when you have an issue with Windows Automatic Updates. It’s popular with Windows 10 users, but you can also notice it on Windows 7/8.
One of the best ways to solve Windows high-performance CPU usage is to transform notifications to’ manual.’ With that done, the Windows Update process doesn’t work in the background. As a consequence, it’s not going to become unresponsive and waste system resources anymore.
Follow the simple steps below to solve this problem. You’ll know how to uninstall the Windows Modules Installer Employee.
NOTE: If this method doesn’t work for you, use method 2, where we teach you how to TIWORKER.EXE.
Step 1
Press the Windows button + R on the keyboard. Now type ‘services.msc’ and click OK.
Step 2

A new window will appear. Now search for ‘Windows module installer’ after clicking the search icon in the right-top corner of the window.
Step 3
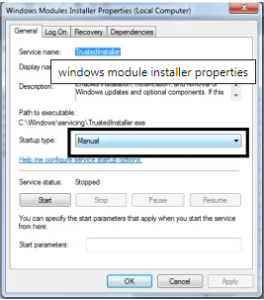
Once you’ve located the Windows Module Installer, double-click it. You’re about to see a new window. Locate ‘ Startup Form ‘ (as shown in the image below). Switch from ‘ fast ‘ to ‘ manual. ‘ Press the OK button at the bottom of the window.
Step 4
Now go back to services.msc window. Search for ‘Windows Update’ this time and set it to ‘manual.’ You simply have to double-click and change the startup type as you did in the previous step.

Step 5
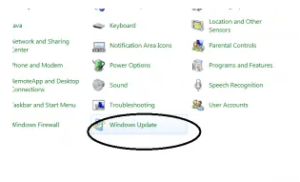
Now open the control panel and find Windows Update.
Step 6
Open Windows Update and go to ‘change settings.’ There you should be able to change the way Windows updates itself. Choose ‘check for update but let me choose whether to download and install them.’ Click OK and close all the windows.
Step 7
This is the final step. Simply reboot your computer. Once your computer restarts, you will have a ‘manual’ update activated. Hopefully, you won’t see the ‘Windows modules installer’ message ever again.
Make sure you check Windows for updates manually at regular intervals. Your computer won’t update itself automatically. Missing important updates could make your OS unstable and cause various performance glitches.
Method 2: Fix TIWORKER.EXE
Sometimes your task manager indicates high CPU usage even when you’ve changed’ automatic’ updates to’ manual’ updates.
In such instances, the issue is because of tiworker.exe. This executable file is also connected to the Windows Update file.
If tiworker.exe triggers heavy CPU usage, you can simply fix it by taking the measures below.
Step 1
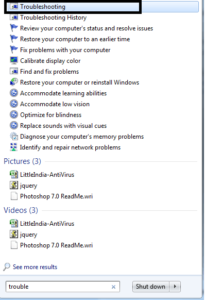
Windows 10 users should press the Windows Home button and search for ‘Troubleshooting.’ Click it to go to the dedicated troubleshooting page.
For users on the older version of Windows, simply search Troubleshooting in the control panel.
See the picture below for further explanation.
Step 2
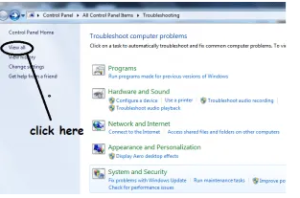
In the new window, look at the left side. You will have some options there. Locate “View All” and click it. See the picture below if you can’t find it.
Step 3
After you go to View All, you should be able to locate ‘System Maintenance.’ Click on it, and it will start detecting issues with your system.
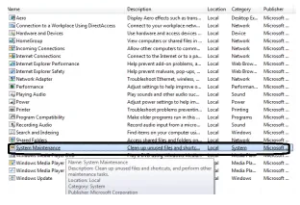
It’s going to take a minute or so. Once done, you need to reboot your computer.
Hope this is going to solve your problem. If you see it after the directions above, go to the next step.
Method 3: Perform a Clean Boot
The last step you should take to fix your problem is to make a new hat. You’re going to do this through the Microsoft Configuration tool included in every Windows system.
This application allows you to find unused and inactive data on your device. You will unlock any amount of space by removing them. In turn, the CPU will be safe from unwelcome resources and operations.
As a consequence, you can feel decreased use of the CPU.
Step 1
Click on the Windows button and search for msconfig.exe. Once found, open it.

Step 2
Once you see the MSConfig window, simply select a normal startup. Press OK.
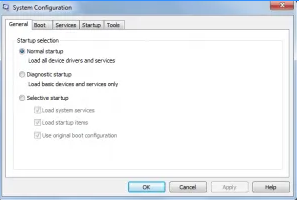
Now go ahead and restart your machine by following the prompts on the panel.
You won’t see heavy CPU usage errors until restarting. You can access as many applications as you want without thinking about your machine going very sluggish.
These are the most common methods of fixing the Windows Modules Installer Worker problem. I hope your problems have been solved by one of the methods. If not, upgrade your hardware to the system.
The only explanation you still get this error is that it doesn’t suit the hardware settings to operate all your applications.
Final Word
Does the screenshot above look familiar to you? If you’re on Windows 10, and you find that the Windows Modules Installer Worker process uses a large percentage of your Processor, you’re definitely not the only one. We’ve seen a lot of Windows users reporting this issue. But the good news is that you can fix it. We’ve put together 2 ideas that you can use.