DNS server not responding: Key Takeaways
Table of Contents
- DNS server not responding: Key Takeaways
- What is a DNS server?
- What Does “DNS Server Not Responding“ Mean?
- What happens when DNS servers fail?
- What Does “DNS Server Not Responding“ Mean?
- What Causes the “DNS Server Not Responding” Error?
- Solved: “DNS server isn’t responding” error on Windows 10
- Quick fix: Switch to a different browser
- Method 1. Restart your router
- Method 2. Change your DNS server
- Method 3. Update your network adapter drivers
- Method 4. Flush your DNS and clear DNS cache
- Method 5. Manually enter your MAC address
- Method 6. Temporarily disable your antivirus
- Method 7. Disable peer-to-peer Windows 10 updates
- Method 8. Disable Internet Protocol version 6 (IPv6)
- Method 9. Disable the Microsoft Virtual WiFi Miniport Adapter
- Method 10. Reset your IP address and network protocols (TCP/IP)
- Final thoughts
The “DNS server not responding” error message indicates that the DNS of the domain you want to reach is unavailable or your browser cannot connect to the internet. here you will get to know about DNS server not responding:
- DNS servers translate domain names into IP addresses, allowing users to access websites on the internet.
- The error can be caused by various factors such as incorrect network configuration, third-party antivirus software, or hardware/network issues.
- Troubleshooting steps to fix the error include restarting the router, changing the DNS server address, updating network adapter drivers, and disabling the antivirus/firewall temporarily.
- Other methods to resolve the issue involve flushing the DNS cache, manually entering the MAC address, disabling peer-to-peer Windows 10 updates, and resetting IP addresses and network protocols.
Internet not working or no Internet access after the Windows 10 update? And running the internet troubleshooter results in the DNS server not responding or DNS Server Unavailable Error? This is a common error caused to due various reasons that include incorrect network configuration, third-party antivirus, third-party apps interfering with your network, and more. Here in this post, let’s first understand what is DNS and how to fix DNS Server Unavailable or not responding Error on Windows 10.
The DNS server is one of the necessary parts of getting a stable, working connection to the internet. Unfortunately, many Windows 10 users have been running into errors regarding this. Some reports say that Windows 10 displays the error message “DNS server isn’t responding” causing websites to stop loading.
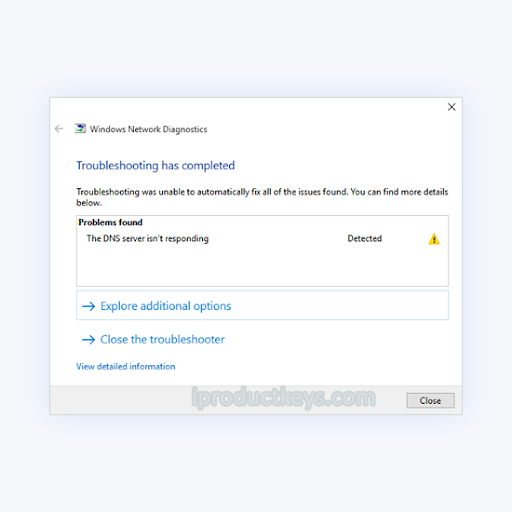
This error can set you back tremendously, especially if you work from home or attend online classes. Don’t worry — we’ve compiled the fastest, working methods to troubleshoot the DNS server and restore it to working order. Let’s get started!
What is a DNS server?
Short Answer: DNS servers translate domain names into IP addresses, allowing DNS clients to reach the origin server. When users type domain names into the URL bar in their browser, DNS servers are responsible for translating those domain names to numeric IP addresses, leading them to the correct website.
The Domain Name System (DNS) is the phonebook of the Internet. When users type domain names such as ‘softwarekeep.com’ or ‘google.com’ into web browsers, DNS is responsible for finding the correct IP address for those sites. Browsers then use those addresses to communicate with origin servers or CDN edge servers to access website information. This all happens thanks to DNS servers: machines dedicated to answering DNS queries.
A server is a program or device providing services to other programs, referred to as ‘clients’. DNS clients, built into most modern desktop and mobile operating systems, enable web browsers to interact with DNS servers.
What Does “DNS Server Not Responding“ Mean?
The “DNS server not responding” error message means that the DNS of the domain you want to reach is unavailable or your browser cannot connect to the internet. Possible fixes include restarting your router or modem, checking for network issues, and updating your browser.
DNS servers play an essential role in accessing web addresses online. With the proper DNS configuration, the server automatically retrieves an IP address whenever a user enters a URL into a browser.
The “DNS server not responding” error usually lies on the user’s end. Often, there is no need to get technical support to fix this error. It is generally easy to find its cause and resolve it immediately.
Fixing this issue can be as simple as troubleshooting your network problems or connecting with a different device. However, there are occasions when you need to disable IPv6 or update the network adapter driver.
To get the right solution, you must first find the reason behind the “DNS server not responding” error.
What happens when DNS servers fail?
Short answer: It results to DNS Server Not Responding.
DNS servers can fail for multiple reasons – power outages, cyberattacks, or hardware malfunctions. In the case of a major DNS server outage, some users may experience delays due to the amount of requests being handled by backup servers, resulting in the common phrase: DNS Server Not Responding. But it would take a DNS outage of very large proportions to make a significant portion of the Internet unavailable.
What Does “DNS Server Not Responding“ Mean?
DNS Server Not Responding error means that your browser was unable to connect to the internet or the DNS of the domain you’re trying to reach are unavailable. In order to resolve it, restart your router or modem, check for network issues and update your browser.
A Domain Name System (DNS) is a directory that translates domain names or hostnames into Internet Protocol (IP) addresses. Due to this process, users can easily access websites on the internet through web browsers.
Sometimes, users encounter DNS error messages when accessing a website, such as the “DNS server not responding” message. This means the web browser can’t connect to the site because the DNS server fails to map hostnames to IP addresses correctly.
There are many causes for the “DNS server not responding” error, from misconfigured network adapters to incorrect DNS server addresses. Fortunately, most of these problems lie on the user’s end and can be solved without much effort.
What Causes the “DNS Server Not Responding” Error?
The DNS server failed issues is often caused by improperly configured DNS records. This might happen when users don’t use the correct values or IP address during the recording process.
Other possible causes of the “DNS server not responding” error are:
- Unavailable DNS provider. Your DNS service might stop working because of DNS errors on its network, such as heavy traffic and server outage.
- Malfunctioning router or modem. A faulty router or modem can also trigger DNS errors. Try switching the ethernet ports or using different ethernet cables to determine whether your router is causing the DNS problem.
- Hardware or network issues. Some hardware or network failures can also cause the “DNS server not responding” error. For example, a single server fails to relay the information to the next server correctly.
- Antivirus software. Problems can occur when the software vendor updates an antivirus program, making the program believe your computer is infected and suddenly block your internet access. When this happens, your browser might show the “DNS server not responding” message.
Solved: “DNS server isn’t responding” error on Windows 10
We’ll be using both standard Windows 10 troubleshooting methods as well as some specific procedures that aim to fix this error message. Our guides are step-by-step, allowing you to restore your internet connection efficiently.
Here are how you can fix the “DNS server not responding” issue:
- Switch to a different browser
- Troubleshoot network problems in network diagnostics.
- Update or reinstall Network adapter drivers.
- Restart your router or modem.
- Temporarily Deactivate antivirus and firewall.
- Flush DNS cache and clear DNS cache
- Change the DNS server address. Replace your ISP’s address with a different DNS address.
- Manually enter your MAC address.
- Disable peer-to-peer Windows 10 updates.
- Disable Internet Protocol version 6 (IPv6).
- Disable the Microsoft Virtual WiFi Miniport Adapter.
- Reset your IP address and network protocols (TCP/IP)
Quick fix: Switch to a different browser
It’s a possibility that the DNS server error only shows up in one specific browser. An outdated client could cause this, security exploits, missing or damaged files, or misconfigured settings.
The easiest way to potentially fix the “DNS server isn’t responding” error would be simply switching to a different browser. For example, try switching to Microsoft Edge if you’re currently using Google Chrome. Edge comes pre-installed on all Windows 10 systems, making it easy to access in situations like this.
Method 1. Restart your router
You can restart your router in 3 easy steps:
- Locate the power button on your router and turn the device off.
- Wait for a few minutes. We recommend waiting 5 minutes to allow your router and network to shut down properly.
- Turn your router back on.
Test if you still experience DNS server issues after giving your router a restart. If necessary, continue reading and try our other methods to solve the error.
Method 2. Change your DNS server
Another easy solution to this error is manually changing your DNS server. By doing so, you can go around limitations and might even get a better internet speed on your device. Here are the steps to quickly change your DNS server to a well-known, fast, and public DNS.
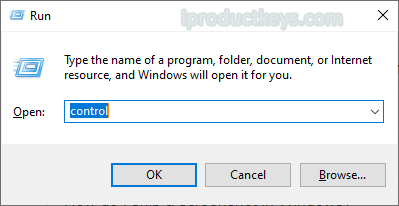
- Press the Windows + R keys on your keyboard. This is going to bring up the Run utility.
- Type in “control” and press the Enter key on your keyboard. This will launch the classic Control Panel application.
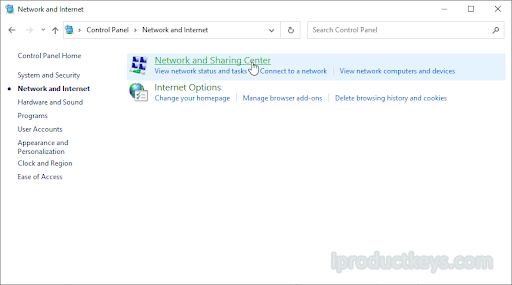
Make sure that your view mode is set to Category, and then click on the Network and Internet heading.
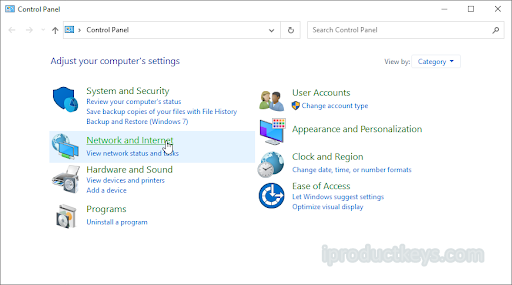
Choose the Network and Sharing Center.
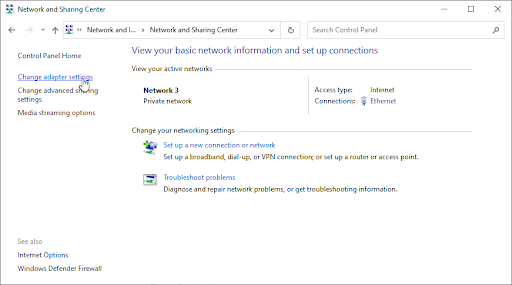
From the menu on the side, click on the Change adapter settings link. This is going to open a new window.
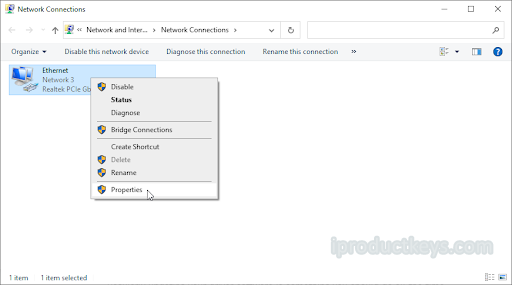
Right-click on the connection you’re currently using and select Properties.
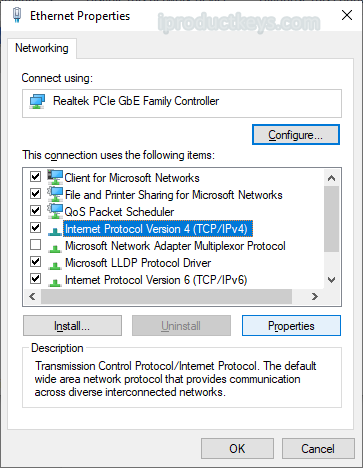
Scroll down and click on Internet protocol version 4 (TCP/IPv4). Click on the Properties button.
Select Use the following DNS Server addresses. Type 1.1.1.1 into the first row, then 1.0.0.1 into the second row. This will change your DNS to the popular 1.1.1.1 server.
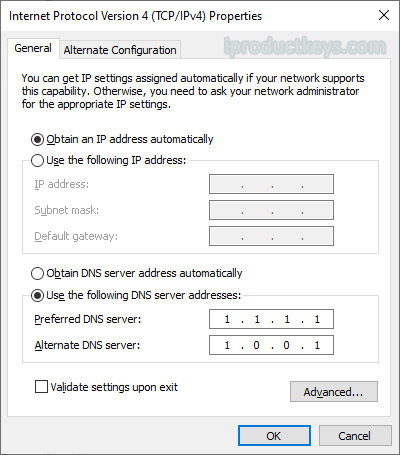
- Click OK to apply your changes. Now, you can see if the DNS server is still having issues.
Method 3. Update your network adapter drivers
Regularly updating your driver software is something you should do all the time. Outdated network drivers can cause more trouble than you’d think.
In this solution, we will be using the integrated Device Manager to update the drivers for your network adapters.
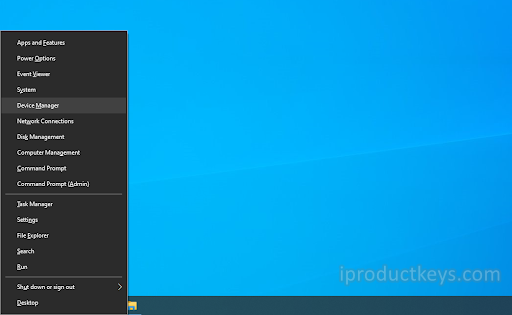
- Press the Windows + X keys on your keyboard, and then choose Device Manager from the context menu.
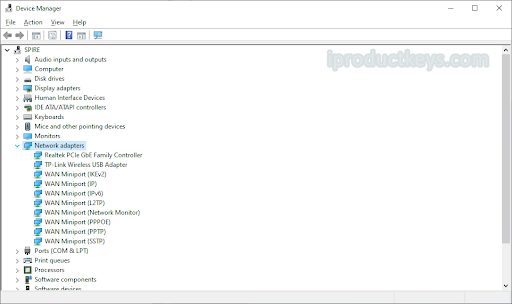
Expand the Network adapters section. Here, simply double-click on the adapter you’re currently using.
Switch to the Driver tab, and then click on the Update Driver button.
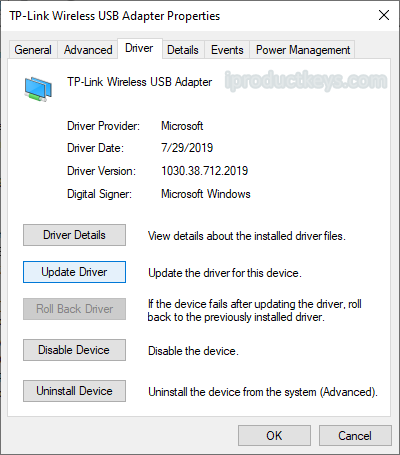
Select the method of updating your driver. You can either let Windows 10 search for a driver automatically or manually locate a new driver file already on your computer.
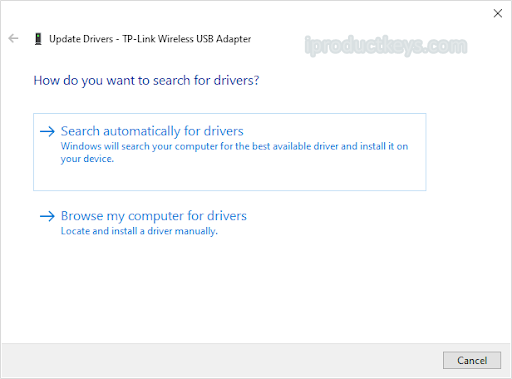
- Wait for the driver installation to complete. Once the driver is installed, restart your computer and check if the DNS server is working.
Method 4. Flush your DNS and clear DNS cache
If your DNS is outdated, you can manually clear its cache to potentially fix the issues this causes. The method is simple and involves using the Command Prompt.
Keep in mind that you might be required to use an administrator account to perform this method.
- Open the Search function in your taskbar, or alternatively use the Ctrl + S keyboard shortcut to bring up the search bar.
- Look up “Command Prompt”. When you see it in the results, right-click on it and choose Run as Administrator.
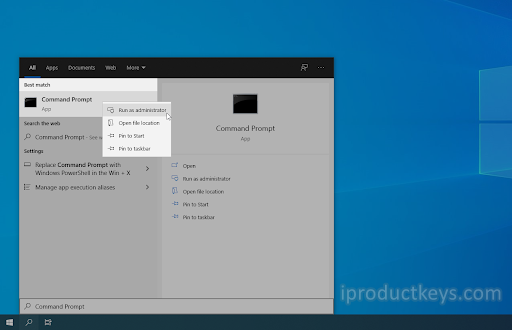
- When prompted by the User Account Control (UAC), click Yes to allow the app to launch with administrative permissions.
- Paste in the following command and press the Enter key to execute it: ipconfig /flushdns
- Close the Command Prompt and check if Google Chrome still shows you the “DNS_PROBE_FINISHED_NO_INTERNET” error.
Method 5. Manually enter your MAC address
Every network adapter installed on your device, be it your PC, laptop or tablet has a physical address called MAC. Your MAC address, or “Media Access Control”, is assigned to the device’s network.
Sometimes, manually finding and then inputting this address to your network properties will fix DNS server-related errors. Let’s see how you can get this done.
- Press the Windows + R keys on your keyboard. This is going to bring up the Run utility.
- Type in “cmd” without the quotation marks and press the Enter key on your keyboard. This will launch the classic Command Prompt application.
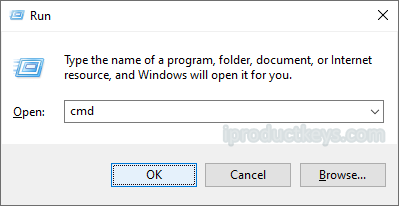
3. Type in the following command, and hit Enter to execute it: ipconfig /all. Find the “Physical Address” line, and take a note of it somewhere.
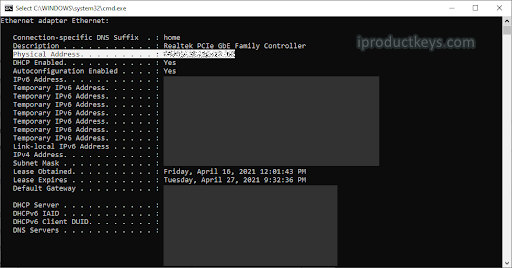
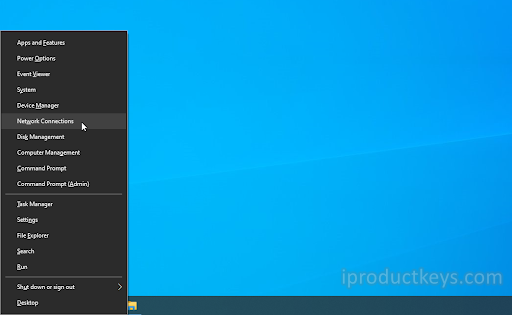
4. Press Ctrl + X on your keyboard, and then click on Network Connections from the context menu.
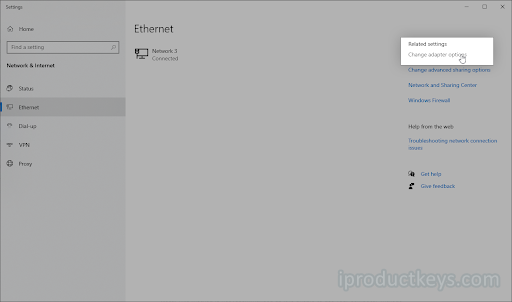
5. Select your current connection type (for example “Wi-Fi” or “Ethernet”) in the left pane, and then click on “Change adapter options” on the right pane.
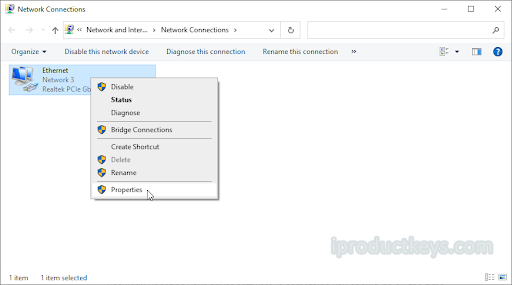
6. Right-click on the connection you’re currently using and select Properties.
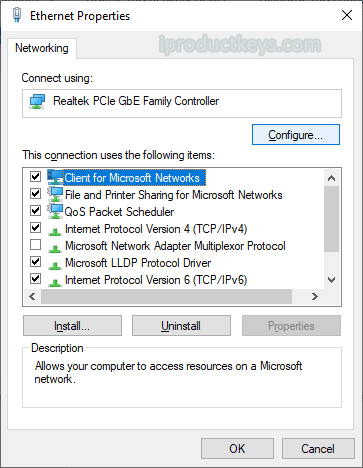
7. Select Client for Microsoft Networks, and then click on the Configure button under the name of your network adapter. A new pop-up window should appear.
8. Switch to the Advanced tab, and then select Network Address from the properties list. Here, use the Value field to input the physical address you noted down in Step 3.
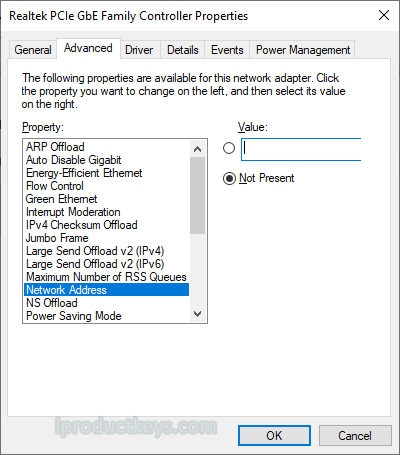
9. Click OK.
Method 6. Temporarily disable your antivirus
Antivirus applications are known to cause issues on computers by interfering with your internet connection or blocking apps and services from running properly. You can test if the antivirus you’re using at the moment is causing the “DNS server isn’t responding” error by temporarily disabling it.
Note: This method is not recommended as it is unsafe to use your computer without protection. Only proceed if you’re aware of the possible risks and have a backup of your system to revert any damage that may happen.
- Right-click on Windows start choose Task Manager.
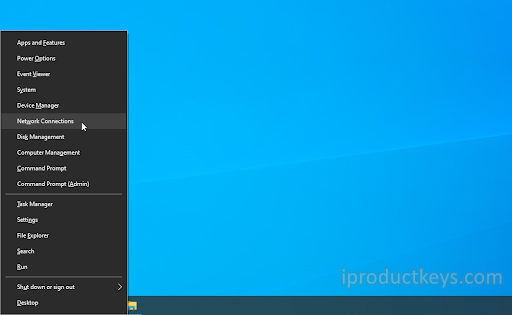
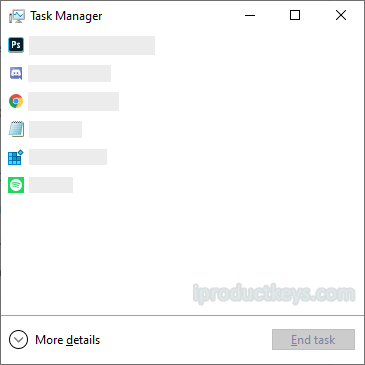
2. If the Task Manager is launched in compact mode, make sure to expand details by clicking on the “Mode details” button.
3. Switch to the Start-up tab using the header menu located at the top of the window.
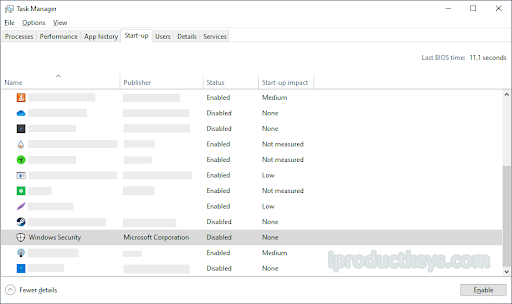
4. Find your antivirus application from the list and select it by clicking on it once.
5. Click on the Disable button now visible in the bottom-right of the window. This will disable the application from launching when you start your device.
6. Restart your computer.
Method 7. Disable peer-to-peer Windows 10 updates
The Peer to Peer (P2P) update feature is quite controversial amongst Windows 10 users. While it aims to make updating your computer easier, it often hogs a large amount of bandwidth and slows down your internet.
This feature has been reported to cause issues with internet speed, DNS servers, and more. Luckily, you can disable it.
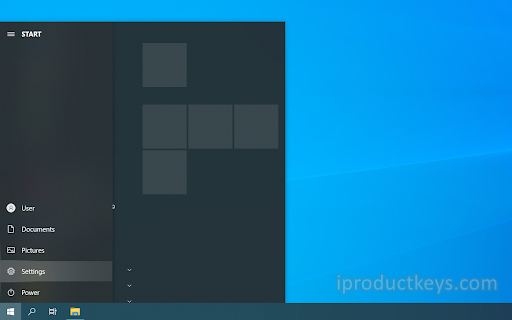
- Click on the Windows icon in the bottom left of your screen to bring up the Start menu. Choose Settings, or alternatively use the Windows + I shortcut.
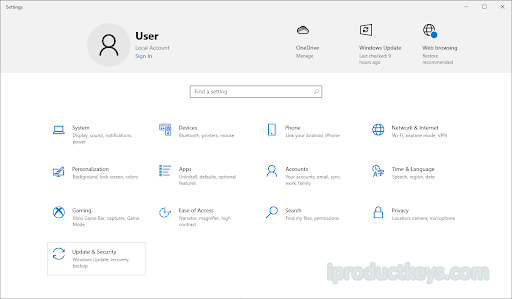
2. Click on the Update & security tile. This is where you can find most of your Windows Update settings.
3. Switch to the Delivery Optimization tab, and ensure that Allow downloads from other PCs is turned Off.
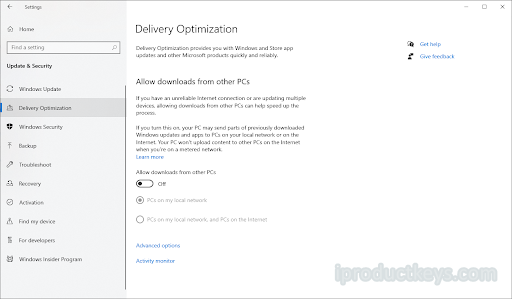
4. After turning this feature off, you’ll no longer use your internet to send and receive updates from other computers. Try and see if the DNS server error still happens after completing the steps above.
Method 8. Disable Internet Protocol version 6 (IPv6)
Internet Protocol version 6 (IPv6) is currently the most recent version of the Internet Protocol (IP). If your network is configured for the earlier IPv4, disabling IPv6 may be able to fix the “DNS server is not responding” error.
- Press Ctrl + X on your keyboard, and then click on Network Connections from the context menu.
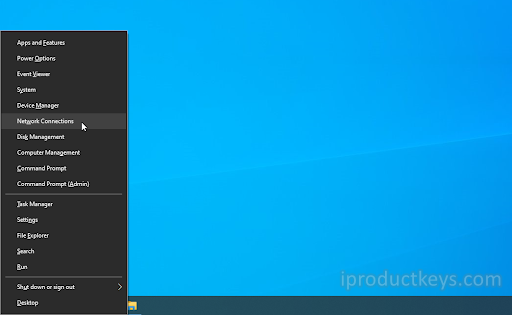
2. Select your current connection type (for example “Wi-Fi” or “Ethernet”) in the left pane, and then click on “Change adapter options” on the right pane.
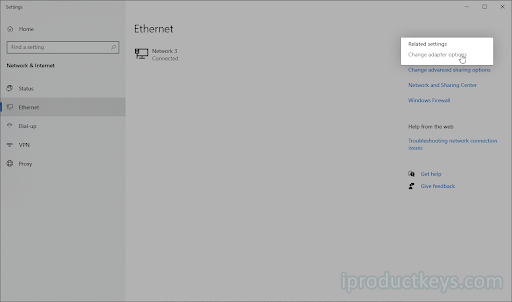
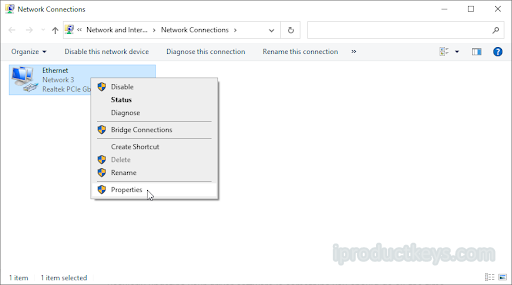
3, Right-click on the connection you’re currently using and select Properties.
4. Scroll down and remove the checkmark from Internet Protocol Version 6 (IPv6). If the option is already unchecked, then IPv6 was previously turned off on your device.
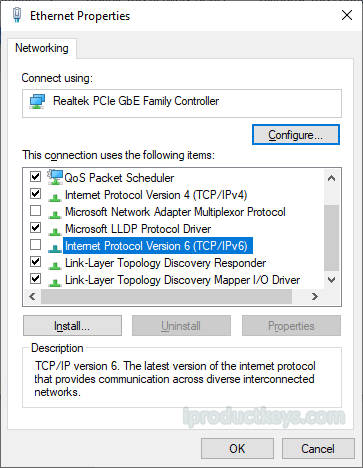
5. Click OK to finalize the change.
Method 9. Disable the Microsoft Virtual WiFi Miniport Adapter
- Press the Windows + R keys on your keyboard. This is going to bring up the Run utility.
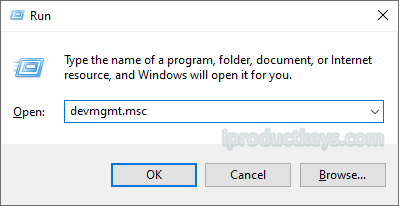
- Type in “devmgmt.msc” without the quotation marks and press the Enter key on your keyboard. This will launch the Device Manager application.
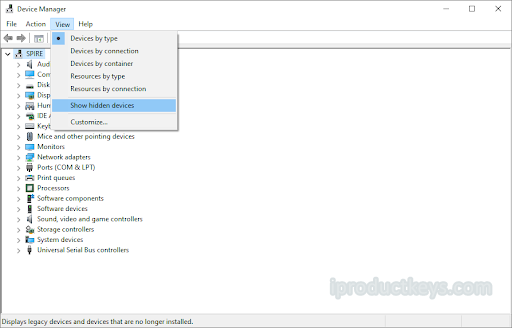
3. Use the toolbar menu and click on View → Show hidden devices. You should immediately see some new devices appearing on the list.
4. Expand the Network adapters category, and then right-click on the Microsoft Virtual Wi-Fi Miniport Adapter. Choose Uninstall device from the context menu.
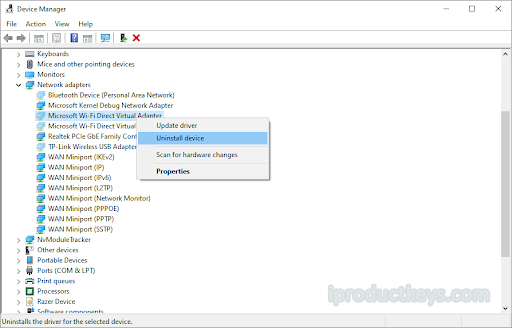
5. Repeat this process for all of the available Virtual Miniport Adapters. When done, close the Device Manager and restart your computer.
Method 10. Reset your IP address and network protocols (TCP/IP)
If none of the methods above worked, you may try to reset your TCP/IP. This requires the Command Prompt and potentially administrative permissions.
- Press the Windows + R keys on your keyboard. This is going to bring up the Run utility.
- Type in “cmd” without the quotation marks and press the Enter key on your keyboard. This will launch the classic Command Prompt application.
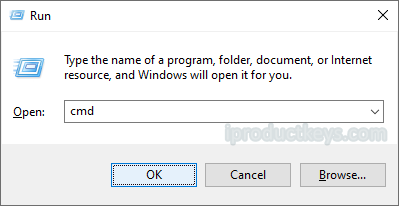
3. Type in the following commands and press the Enter key after each line to execute them:
- 1st Key: ipconfig /release
- 2nd Key: ipconfig /all
- 3rd Key: ipconfig /renew
4. Stay in the Command Prompt you previously opened. Type in and execute the following commands in order:
netsh int ip set dns
netsh winsock reset
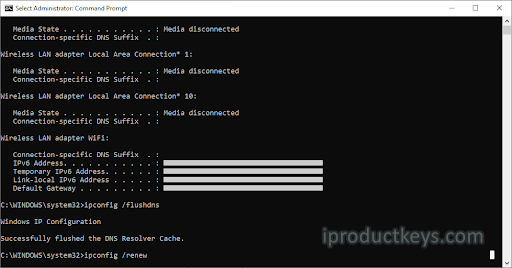
5. After successfully executing the commands, exit the Command Prompt and reset your PC. Check if the “DNS server isn’t responding” error is still present.
Final thoughts
The “DNS server not responding” message means that your browser cannot connect to the internet, which commonly happens due to DNS errors or network issues.
Here are how you can fix the “DNS server not responding” issue:
- Troubleshoot network problems. Run network diagnostics to identify and troubleshoot internet connection problems.
- Restart modem or router. Clear your modem or router’s cache by pressing its power button and unplugging its power cable.
- Deactivate antivirus and firewall. Temporarily disabling your antivirus and firewall programs might help to solve the DNS issue.
- Flush DNS cache. Clear the router cache to refresh the DNS configuration.
- Change the DNS server address. Replace your ISP’s address with a different DNS address.
We hope this article has helped you solve the “DNS server not responding” issue.
If you have any more questions or suggestions, please share them in the comments section below.


